Stichword-Archiv: 3d printing

PLA Print Settings: Print bed temperature

Oktober 17, 2017 7:42 pm Veröffentlicht von

Yesterday, I found this useful model by SpaceFanatic on thingiverse: https://www.thingiverse.com/thing:1002024 and wanted to print it, using golden eSun pla (http://www.esun3d.net/products/144.html).
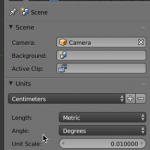
Unfortunately, when printing on a 60°C print bed with my lulzbot taz 6 (which is the cura lulzbot edition preset for eSun PLA), I recently had problems with the bed adhesion of PLA. The printbed has been cleaned with alcohol before the print has been started.

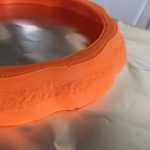
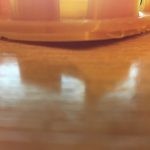
You can see the problem in the following images of the first print attempt.

Of cause, this is problematic, especially if you are printing two separate parts that are meant to fit together as it is the case in this model.
My first attempt was to increase the bed temperature to 70°C which turned out to be a very bad idea, as the bed adhesion did not increase but decrease. After two to three layers, the print started to move around on the print bed.
The next try was to increase the print bed temperature only by 5°C to a total 65°C and add a brim to the print. 
Here you can see the brim, generated by cura at the top part of the box.
As you can see there is not much space between the outer shell and the inner circle of the model. This made the removal of the brim some more work than just removing it on the outside of a print. But, the final result is satisfying as it stays flatly on the table as you can see in the following images.

Minimal steps for modelling 3D prints in Blender

Oktober 4, 2017 9:20 pm Veröffentlicht von

When I started 3D printing, I decided to go with blender for modelling my objects. I made this decision as it simply was the only 3D modelling tool I knew and had used before. It can do much more than you need for modelling for 3D printing: Things like textures and shading are not necessary and therefore you don’t need to get an expert in those topics but only need to know the basics of modelling to get started. Here are the steps and settings I use and repeat nearly every time I create a model for printing on my own.

Scene Unit

The first step I usually do is setting the scene unit. In the outliner editor (by default a pane on the right edge of blender) you can select Centimeters as unit, which I find a quite useful setting. Default sizes for object are in the area of size that they can be handled easily – a 1m cube is not too useful for most 3D objects I want to print.

Size and position

When you focus the 3D View window (the big one in the middle) and press n, the Transform pane opens, showing the properties of the currently selected object. You can use it to give the object you selected exact coordinates, sizes, rotation and so on. Very handy if your model needs to fit into an exact place in your household or you are designing a box for your raspberry pi and need entry points for the different connectors.

Export to STL

Most slicing tools support STL as the de-facto standard for 3D printing. Good news: Blender ships by default with an export function for the STL format and therefore you can easily create your model in a way suitable for slicing tools like Cura. To do so, navigate in the menu to File->Export->Stl. Make sure to tick the checkbox Scene Unit, so you get the object in the desired size when you import it in your slicer.

I usually find it useful to also tick the Selection Only check box, as I often use boolean modifiers (for example to create the entry point for micro USB cable in the raspberry pi case). They add a number of additional objects to the scene, which I do not want in the export.

HIPS Cold Acetone Vaporing

September 12, 2017 6:29 am Veröffentlicht von

Everyone who regularly prints 3d models using a 3D printer comes around the topic of post processing 3d prints sooner or later. Due to the layer-by-layer growth of the print, you see bigger or smaller steps depending on the configuration of the printer. To get the print smoother, there is a number of techniques people are trying: From sandpapering to putting glue onto the print. Another technique is cold acetone vaporing. There are a lot of resources about post-processing ABS with acetone vapor.

In this technique you put the print into a closed chamber with a paper towel soaked with acetone so the print gets exposed to the acetone vapor for some hours. As a result, the print gets shiny and smooth. A good introduction video can be found on youtube (https://www.youtube.com/watch?v=9qByAGrbmS8).
But, when it comes to a different material than ABS, information gets more diffuse. For example, I tried to find out how to smooth a HIPS print, but I found different pages by different people, with different feedback: Some say you can smooth a HIPS print, some say you can’t.
So, I decided to try it out myself and document the process.
The filament I’m going to post-process is Esun HIPS, which you can order in the LulzBot online shop (https://www.lulzbot.com/store/filament/hips-esun). I will use it to print my own scary pumpkin found on thingiverse.com (https://www.thingiverse.com/thing:134066).

0h

I use the first centimeters of such a pumpkin for the experiment to show a before/after of the vaporing process. Here is, how it looks before I start.
To smooth it, I use an old pot (The pot won’t get heated up, we do cold acetone vaporing), put a paper towel inside and tip some acetone onto the paper towel. To make sure the print is not exposed directly to the liquid, I fold some aluminium foil and used it as ground for the print.

1h

After 1 hour the print gets a bit shinier, but the form doesn’t change noticeably.

2h

After 2 hours, the print has even more gloss, and it has some remarkable increase in the smoothness, but not too much.

3:30h

After 3 and a half hour, you can see the print is clearly smooth and has a high glossiness. This picture shows a direct comparison before smoothing and after drying over night, as the print is very sticky after 3 and a half hours of exposure to acetone vapor.
As this looks pretty much as I expected it, I decided to smooth the complete pumpkin for 4 hours without interruption, and here is how it looks like.
As you can see, the effect is less visible on the top of the pumpkin than at the bottom. I think this is due to the paper towel on the bottom of the pot, maybe it gets more homogeneous when you put more towels to the sides of the pot as well, as shown in the video I mentioned earlier.

To conclude, it might depend on the supplier of your HIPS, but the one mentioned above from Esun is clearly prone to acetone vaporing.