When I started 3D printing, I decided to go with blender for modelling my objects. I made this decision as it simply was the only 3D modelling tool I knew and had used before. It can do much more than you need for modelling for 3D printing: Things like textures and shading are not necessary and therefore you don’t need to get an expert in those topics but only need to know the basics of modelling to get started. Here are the steps and settings I use and repeat nearly every time I create a model for printing on my own.
Scene Unit
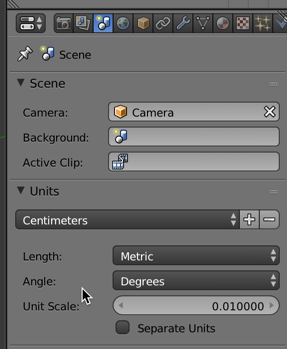
The first step I usually do is setting the scene unit. In the outliner editor (by default a pane on the right edge of blender) you can select Centimeters as unit, which I find a quite useful setting. Default sizes for object are in the area of size that they can be handled easily – a 1m cube is not too useful for most 3D objects I want to print.
Size and position
When you focus the 3D View window (the big one in the middle) and press n, the Transform pane opens, showing the properties of the currently selected object. You can use it to give the object you selected exact coordinates, sizes, rotation and so on. Very handy if your model needs to fit into an exact place in your household or you are designing a box for your raspberry pi and need entry points for the different connectors.
Export to STL
Most slicing tools support STL as the de-facto standard for 3D printing. Good news: Blender ships by default with an export function for the STL format and therefore you can easily create your model in a way suitable for slicing tools like Cura. To do so, navigate in the menu to File->Export->Stl. Make sure to tick the checkbox Scene Unit, so you get the object in the desired size when you import it in your slicer.
Stichwörter: 3d printingI usually find it useful to also tick the Selection Only check box, as I often use boolean modifiers (for example to create the entry point for micro USB cable in the raspberry pi case). They add a number of additional objects to the scene, which I do not want in the export.
Kategorisiert in: Allgemein
Dieser Artikel wurde verfasst von Manuel Dewald


